Difference between revisions of "Mod:Create a portrait"
Jump to navigation
Jump to search
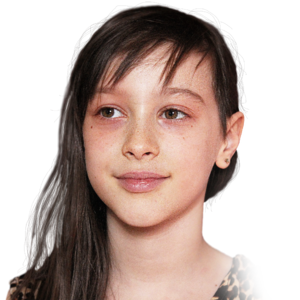
 For successful integration into The Sum, the photo to be used should be framed at the shoulders, include the entire head, and be taken relatively from the front.
Anabellebel (talk | contribs) (Created page with "Ce tutoriel vous expliquera comment créer un portrait à ajouter à ''Nous Aurons''. file:Exemple de g...") |
Anabellebel (talk | contribs) m |
||
| (2 intermediate revisions by the same user not shown) | |||
| Line 1: | Line 1: | ||
| − | + | This tutorial shows how to create a portrait [[Mod:Create_a_character#Assign_a_portrait|to add]] in ''[[Wikipedia 2197|The Sum]]''. | |
| − | [[file:Exemple de grand portrait.png|thumb|300x300px| | + | [[file:Exemple de grand portrait.png|thumb|300x300px|Example of large portrait with dimensions of 300 x 300 pixels.]] |
| − | == | + | == Required tools == |
| − | * [[Mod: | + | * [[Mod:Recommended_Programs#Photoshop|Image editor, like '''Photoshop''']] |
| − | * [[Mod: | + | * [[Mod:Editors#Phoenix_engine|Phoenix engine (''FT Tools'')]] |
| − | == | + | == Create a portrait == |
| − | + | There are two types of portraits: a small one (the most common) and a large one (for the [[The_Sum:Contents#Main characters|22 main characters]]).{{Idea|For successful integration into ''[[Wikipedia 2197|The Sum]]'', the photo to be used should be framed at the shoulders, include the entire head, and be taken ''relatively'' from the front.}} | |
| − | === | + | === Small portrait === |
| − | [[file:Exemple de portrait.png|thumb|75x100px| | + | [[file:Exemple de portrait.png|thumb|75x100px|Example of a portrait with dimensions of 75 x 100 pixels.]] |
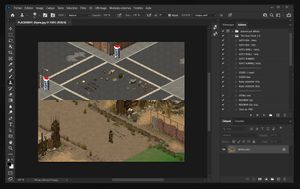
| − | [[file:Ecran Photoshop.jpg|thumb| | + | [[file:Ecran Photoshop.jpg|thumb|This tutorial uses mainly Photoshop, but any other image editor will do.]] |
| − | # | + | # Open the photo in '''Photoshop''', then immediately save a ''.psd'' version of it.{{Idea|Name this file '''_code_name_of_character.psd''.}} |
| − | # | + | # Go to the {{False button|Layers|color=gray2}} menu and then {{False button|New|color=gray2}} and {{False button|Layer from Background...|color=gray2}}. Press {{False button|OK|color=gray2}} |
| − | # | + | # With the '''lasso''' tool ({{False button|l|color=white}}), cut the outline of the portrait to remove the background.{{Idea|The tool ''Background eraser'' can also be useful for this task.}} |
| − | # | + | # Change the tool for '''cropping''' ({{False button|c|color=white}}), and in the property bar (top), in the boxes to the right of {{False button|W/H ratio|color=gray2}}, type '''75'' and '''100''' and make sure {{False button|Delete cropped pixels|color=gray2}} is unchecked |
| − | # | + | # Crop the image close to the face (note that the proportion is preset). |
| − | # | + | # Press {{False button|ctrl|color=white}}+{{False button|s|color=white}} to save. |
| − | # | + | # Go to the {{False button|Image|color=gray2}} menu then {{False button|Image size...|color=gray2}} |
| − | # | + | # Change the width of the image to 75 pixels (the height should automatically be set to 100 pixels) |
| − | # | + | # Go to the menu {{False button|File|color=gray2}} then {{False button|Save as...|color=gray2}} then save as ''.png'' in ''Game/core/---BOX---''.{{Warning|Close the image without saving it. The ''.psd'' file already created is of better resolution}} |
| − | === | + | === Large portrait === |
| − | + | Follow the previous steps (or start from the file ''.psd'' that you have created) and resize the image to ''300 x 300 pixels'' instead of 75 x 100 pixels. | |
| − | === | + | === Convert to '''.zar''' file === |
| − | # | + | # Open the folder ''Game/'' then '''FT Tools.EXE'''. |
| − | # | + | # Click on {{False button|OK|color=white|button=yes}}. |
| − | # | + | # Click on {{False button|PNG To ZAR|color=black|button=yes}}. |
| − | # | + | # Open the folder {{Fake button|[[file:Icons8-folder.png|20px]]---BOX---|color=black}} and select your portrait to convert. |
| − | # | + | # Move the ''.zar'' file created in the folder ''---BOX---'' to the folder ''Game/core/gui/char''.{{Idea|Although ''.png'' files work in [[Wikipedia 2197|''The Sum'']], it is recommended to only use the ''.zar''.}} |
Latest revision as of 20:49, 21 September 2022
This tutorial shows how to create a portrait to add in The Sum.
Required tools[edit | edit source]
Create a portrait[edit | edit source]
There are two types of portraits: a small one (the most common) and a large one (for the 22 main characters).
Small portrait[edit | edit source]
- Open the photo in Photoshop', then immediately save a .psd version of it.
- Go to the Layersmenu and thenNewandLayer from Background.... PressOK
- With the lasso tool (l), cut the outline of the portrait to remove the background.
- Change the tool for cropping' (c), and in the property bar (top), in the boxes to the right ofW/H ratio, type 75 and 100 and make sureDelete cropped pixelsis unchecked
- Crop the image close to the face (note that the proportion is preset).
- Press ctrl+sto save.
- Go to the Imagemenu thenImage size...
- Change the width of the image to 75 pixels (the height should automatically be set to 100 pixels)
- Go to the menu FilethenSave as...then save as .png in Game/core/---BOX---.
Large portrait[edit | edit source]
Follow the previous steps (or start from the file .psd that you have created) and resize the image to 300 x 300 pixels instead of 75 x 100 pixels.
Convert to .zar file[edit | edit source]
- Open the folder Game/ then FT Tools.EXE.
- Click on ⦿ OK.
- Click on ⦿ PNG To ZAR.
- Open the folder and select your portrait to convert.
- Move the .zar file created in the folder ---BOX--- to the folder Game/core/gui/char.
 Although .png files work in The Sum, it is recommended to only use the .zar.


